Working with Managed Files
Ektron CMS400.NET can track and manage any non-Office type of file that runs on your computer (for example, .PDF, .gif and .zip).
You use a host application to create the file. For example, you use Photoshop to create a .jpg file. Next, save it to Ektron CMS400.NET using any method explained in Importing Office Documents. While importing, add supporting information, such as summary, metadata, taxonomy category, and schedule. Once the file is imported, you use standard toolbar buttons to perform actions like view history, submit for publishing, and delete.
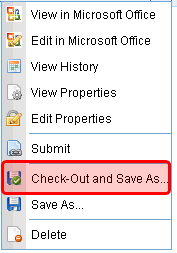
If you want to edit a managed file, use the Check out and Save As menu option to place a copy of it on your computer. Then, edit it using the host application. When done, drag and drop the changed file to Ektron CMS400.NET.
Managed File Menu Options
Depending on a managed file’s status, your role, and position in the document’s approval chain, any of the following options may be available for a managed file. They appear when you display the dropdown menu from the Workarea Content Menu. See Also: Workarea Content Menu.
Note: The referenced topics (below) describe working with Office documents. Everything works the same with managed files.
|
Menu option |
Description |
For more information, see |
|
View |
View and edit managed file and its Ektron CMS400.NET information (Summary, Metadata, History, etc.). Can also be used to replace file. |
|
|
Save As |
Save copy of managed file to your computer |
|
|
Check Out and Save As |
Change a managed file’s status to checked out and save a copy to your computer |
|
|
Edit |
Overwrite a managed file in Ektron CMS400.NET with a version on your computer. The new file name must match the existing one. |
|
|
Check In |
Change a checked-out managed file’s status to checked in. Useful if you checked out and saved a managed file then it became lost or corrupted. This option lets you change its status back to checked in. |
|
|
Submit/Publish |
Submit managed file into approval chain |
|
|
Delete |
Delete managed file; deleted file cannot be retrieved |
Creating a New Managed File
You cannot create a managed file within Ektron CMS400.NET. Instead, create it on your computer using the host application then import it into DM.
Importing Managed Files
Warning! You cannot import files whose name includes a percentage sign (%) or ampersand (&).
You import managed files into Ektron CMS400.NET using the same methods you use to import MS Office documents. See Importing Office Documents.
If you do not see a file you uploaded, verify that the View Menu box is displaying the type of file you are looking for. Files upload to the correct type regardless of what is selected when you drag and drop them.
Editing a Managed File
You do not edit a managed file within Ektron CMS400.NET. Instead, you check it out, save it on your computer, edit it using the host application, then check it back in to Ektron CMS400.NET. While it is checked out, only you or a system administrator can edit the managed file within Ektron CMS400.NET.
Note: Alternatively, you can edit within a mapped network folder. See Edit Using a Mapped Network Folder.
Follow these steps to edit a managed file.
1. From the Workarea, select the Content folder.
2. Select the managed file’s folder.
3. Select the managed file you want to edit.
4. Hover the cursor over the triangle (
5. Click Check out and Save As from the dropdown menu.

6. Select a folder on your computer in which to save the file.
7. Open the host application.
8. Edit and save the file.
9. Return to Ektron CMS400.NET and open the file’s folder.
10. Click Add Assets (circled below).

11. Use the Add Asset File Upload tab to import the file. See Also: Add Assets Button: File Upload Tab
Note: You cannot change the file name.
Deleting a Managed File
Note: You must have delete permissions for the folder that contains the document. See Also: Folder Permissions.
|
Ektron Best Practice Check for broken quicklinks before deleting documents. See Link Checking. |
1. From the Workarea, select the Content folder.
2. Select the managed file’s folder.
3. Find the managed file you want to delete.
4. Hover the cursor over the triangle (
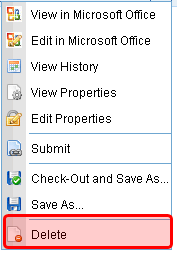
5. Click Delete from the dropdown menu.

6. You are asked to confirm the deletion. Press OK.
7. The asset enters its approval chain.
Like publishing, deleted content must go through the approval chain before it is removed. If you are the last approver in the approval chain, the content is deleted immediately. See Also: Approve/Decline Content
